Showing posts with label kitchen. Show all posts

Tuesday, September 24, 2013

Kitchen Ideas

Yesterday while I was at the gym I was watching Love it or List it.  I kind of hate that show.  But they were working on a kitchen on this particular episode.  And that got me thinking about our kitchen.  We don't have tons of cabinet space.  And we definitely don't have a pantry.  We have a lazy susan cabinet that has some food in it.  The top cabinet to the right of the stove has food in it.  And then I keep cereal and stuff in a bottom cabinet by the dishwasher.  So, it's pretty much scattered all around the kitchen.  It's fairly ridiculous.

So, I'm kind of thinking I can build (with the help of my dad) a pantry.  We have a floor to ceiling cabinet beside the stove.  It has the vent for the furnace, the stove, or something.  I don't really know.  I just know it's a big pipe...  I store the broom, the mop, our lunch boxes, and food wrap in there.  The upper part of that cabinet has hot pads, my cookbook rack, and my food scale. 
Okay, so there's the cabinet beside the stove.  And I'm kind of thinking I could build a pantry on the same side of the kitchen but beside the fridge.  I think it would kind of cap things off perfectly.  It wouldn't be quite as big as this cabinet.  But it would be perfect pantry size.  And it could also house our trash can I think.

So see, there's just this extra space there on the side of the fridge.  And the wall is just kind of awkward.  It might just be the storage solution I've been looking for.

Even from the front it looks unfinished.  And I hate walking into our house and seeing that trash can.  Not the most attractive thing ever.  I could even do chalkboard paint on the side for my weekly menu.  Or make it magnetic or something so that it was still totally functional.

What do you think?  Anybody else tried adding on to your cabinetry?  I'm also thinking this might mean I could reface all of my cabinets to get rid of that super 70-ness.  Now I just have to convince my dad and my hubby that this is a good idea.

Thursday, September 5, 2013

Clever Camoflauge

As you've probably figured out by now, there were some weird things about our house when we bought it.  One being a hole in the kitchen/dining room wall.  Yup, a hole.  Why was there a hole in the wall?  That's a very good question.  The best guess I have is that the location of the hole was where an old rotary wall phone was.  Much like the phone on the wall in my parents kitchen when I was a kid.  Before we covered up the hole there were some phone-ish looking wires that you could see.  Also, a Q-tip.  I don't even want to know.

It wasn't even a question as to whether we would cover up the hole with something.  I had envisioned something that would blend with the paneling.  My dad just knew I wanted the hole covered so he worked with what was on hand.  Oh yes, this is going somewhere weird.  If you recall, we had this whackadoodle pink Formica on the countertops and on the walls as backsplash.  Awesome.
What you can't see in this picture is the fact that part of the backsplash was very very loose.  So, my father, being the sweet and resourceful man he is...  And knowing I desperately wanted that hideous backsplash gone, cut off part of the Formica, turned it glue side out and cut a piece to fit in the hole.  So yes, I have a piece of Formica stuck in my wall, glue side out.  It's painted over, it matches the walls.  Except for the part that the rest of the wall is paneling and you know, paneling texture, not glued Formica texture.

I really appreciate that my dad fixed it.  And I don't know that any other solution would've really been any better.  So, we've always hung something over the hole.  The awkward thing is though, the hole is low and not really visually a normal level to hang pictures.  It's driven me crazy for the past two and a half years.  I had one of those cute name signs hanging over it, I like the sign, it just didn't look quite right.

So, the other day on Pinterest I stumbled across some adorable printables.  I love things that are kind of funny puns.  And kitchen related puns are even better.  This was only made more perfect that my sister got me an Etsy gift card, thus allowing me to purchase these adorable printables.  Hooray!  They were delivered to my inbox in a flash, I printed them at Walgreens and picked up some cheap frames to pop them into.

I hung them in a sweet little four-some.  I'm so pleased with how it turned out.  If I was a better DIY-er, I would've measured and used a level but I never do.  I totally hang everything by eyeballing it, for the most part this has worked out okay with me.


Excuse the awkward pictures.  My dining table was in the way and my kitchen was not in its most flattering light.  I'm so happy with how they turned out.  And they are oh so cute.  When we had people over this weekend, everybody commented on them.  I call that a success.  And it's at a much better level and still disguises the wall patch.

Anybody else have weird holes in their walls?  No?  Just me?  Sadly, that's what I thought.  How do you deal with funky decorating problems?

Thursday, July 11, 2013

Clean in 2013 Update

My motivation is back in full swing.  Which kind of means chaos right now.  We're making serious progress though.  And we're getting ready to make a huge mess this weekend.  More about that tomorrow though.  Today, it's just a little project.  My kitchen drawers.  All three of them.  But it means we're one step closer to Clean in 2013.
Yup, we only have three kitchen drawers.  One of them is still a disaster zone but I have a plan for that.  So I set off on Tuesday afternoon to solve all my kitchen drawer problems.  After striking out at the dollar store I headed over to Walmart.  I spent forever in the kitchen storage before striking upon a silverware tray that would work.  I measured all my drawers before I left, I wanted to make sure I bought stuff that would actually fit.  So, I found a new silverware tray.  But I was still not having any luck for my kitchen utensil drawer.  Then I got the best idea ever, the office supply section.  I found a perfect solution there, it's actually a desk organizer but is multiple pieces that snap together and for way less than similar organizers in the kitchen aisle.  Score!

So, now here's a break down.  I fully meant to take before pictures.  I even had a concrete thought and said to myself "Don't forget to take before pictures."  And then I got home and I was so excited to get started and have pretty drawers that I forgot to take before pictures.  Fail.  But I think it was totally worth it.

So, since there are no before, let's get straight to the afters.  And a break down of my new organization.  It's magical.

First, the silverware drawer.  I picked up a Rubbermaid non-slip expandable silverware holder.  The back part slides out to fill your whole drawer so there is no wasted space.
1.  Measuring spoons
2.  Random small kitchen items.  The filter for regular coffee for the Keurig.  Beaters for the hand mixer (which I  never use).  A wine stopper.  Liquid tablespoon measure.
3.  Long knives that wouldn't fit in the silverware holder.
4.  Weird miscellaneous stuff.  Tooth picks, the blades for our french fry cutter and a roll of tape.
5.  Steak knives
6.  Spoons
7.  Forks
8.  Butter knives
9.  Meat Thermometer and marinade brushes.

I love it so much.  Everything has a space and there's no space to shove weird extra stuff in.  Other than that tiny area on number four.  I did that intentionally though.  I like having a roll of tape in the kitchen.  And that seemed like a perfect little nook for the toothpicks and french fry cutter blades.

And now the utensil drawer.  Despite frequent cleaning out, this drawer is always a disaster.  But now it's all sorted and everything has a specific place.  And once again, not a lot of extra space for extra junk to accumulate.
1.  Rolling pin.  That doesn't need a divider.  It just chills in the edge of the drawer.
2.  Large task specific utensils:  an ice cream scoop, small cheese grater, can opener, and pineapple cutter.
3.  Wooden spoons
4.  Silicon spatulas
5.  Small task specific utensils:  a bottle opener, apple corer, and candy thermometer.
6.  Meat injectors.  Yes, we have a whole container of those.
7.  Tongs and pizza cutter.  Yup, those are just free and easy inside the drawer.
8.  Scissors
9.  Egg slicer
10.  Grease trap for the electric skillet

I try to not buy too many task specific kitchen utensils.  I think it's a waste of space and money.  There are some things that are worth it though.  In hindsight, my whisk is not in this picture, it must have been in the dishwasher.  It's going to go into bin #2 though.  

How's your kitchen organization?  Anybody else stepping outside the box and using other organization to corral kitchen utensils?  I need another cereal box to upcycle into a baggie holder so that I can reclaim my third drawer.  Guess I should go buy a box of cereal....

Tuesday, June 4, 2013

Get with the Plan Man

I said it was coming....  I've been working on it....  It's here....  My whole meal plan and cleaning calendar plan.  These are all chilling on the side of my fridge in pretty white frames.  With a dry erase marker hanging out near by.  I'm so excited!  This is going to be great!  So, without further ado, here are my pretty pages close up.


As usual, I just uploaded them to Walgreens and printed them as pictures.  I picked up all three of them, thanks to a coupon code for 40% off for around $6.  Sure I could've printed them at home but I think they turn out a bit better printed as a photo.  And it means I don't have to buy ink for my printer.  It's a win-win.

I left the weekend days off my meal planning.  I knew we wouldn't successfully meal plan for the weekend.  In the summer we usually grill at least once.  And we usually go out to eat at some point.  So we're usually pretty casual on the meals for the weekend, especially for just the two of us.

I think I'm pretty happy with my color choices.  With the red and black kitchen, I needed something that would still match but wasn't necessarily the same color.  And I'm loving coral these days.  I'm still on a quest to make my office at work coral and turquoise.  I just need the right fabric to cover my bulletin boards with. 

So, here's my creation on my fridge.  My husband didn't really so much know I was doing these.  He came home last night and saw them on the fridge and was super impressed.  Yay!


It's really hard to take good pictures of the side of my fridge....  Also, really hard to take pictures of picture frames.  I'm in love though.  And our menu for the week is already written on the fridge.  Well, it wasn't when I took the picture because I forgot.  But it is now.

Project Clean in 2013 is well under way.  And feeling very successful.  So, what are you guys planning for dinner tonight?  Steak quesadillas are on the menu for us.  We grilled Sunday and have leftover steak.   Mmmm, it's going to be delicious.

Thursday, May 30, 2013

What's For Dinner (Part 1)

If your house is like mine, you are always trying to figure out what to cook for dinner.  It's the same conversation every night.  "What do you want for dinner?"  "I don't know, what sounds good to you?"  "Oh, I don't care.  Whatever you want."  Arg!  It can drive a girl crazy.  Maybe you're already on the meal planning bus.  If so, good for you!

Last night while we were catching up on episodes of NCIS, I made a huge list of all the things I regularly make.  Eventually it's going to get made into a pretty printable list.  For now, it's on notebook paper, written with hot pink ink.  But I have created a weekly menu sheet.  It's going to go in a frame on the fridge.  That way I can write on the glass and it will be dry erase.  Perfect.  This is totally my favorite way of keeping track of things.  It's fantastic.  All the perks of a dry erase board but none of the traditional ugliness.

So, here's my meal planning sheet for the week.  I'm off to Walgreens to pick up a print of it so that I can throw it in a frame.  I may update my cleaning calendar to match it so I can stick that on the fridge as well.

How do you plan your meals for the week?  Any great tips you'd like to share?  I can use all the help I can get!

Wednesday, May 15, 2013

Stuck On You

Progress!  I made progress!  Last night I cleared off our table in the front hall.  There are no before and after pictures.  Just picture a pile of mail vs no pile of mail.  I think I may put a vase of flowers and a bowl for keys on the table instead of the tray that's there right now.  The tray encourages the piling.  So if there are pretty things in the way, maybe we will be less likely to pile.  Here's hoping.

And I cleaned out one of the kitchen cabinets.  My cabinet with pots and pans drives me crazy.  It's not a very big cabinet and I have a lot of pans -- muffin pans, mini loaf pans, cake pans, and cookie sheets.  Things are always crashing down on me when I open the door.  Or more accurately, sliding out on my toes.  Not cool.  So, this is what we started with.
Before

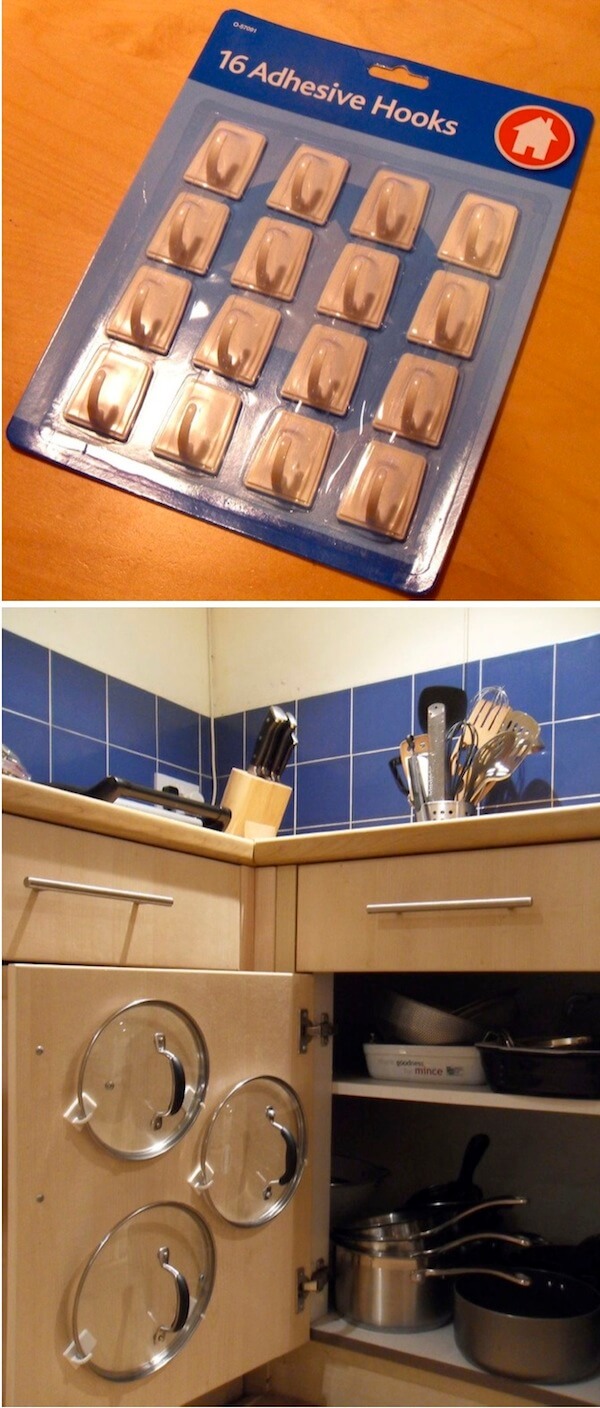
Okay, that is just ridiculous.  And yes, that's a deviled egg plate in with the baking stuff.  I know it doesn't make sense.  To be perfectly honest, I had already pulled the pot lids out because I had a plan.  In the end, I pulled everything out.  And I had a plan.  I'd seen a couple of ideas how to better store my lids.

I really loved the first picture with the rail, just resting the lids inside.  Perfect and beautiful.  However, the doors on that cabinet are fairly narrow and that just wouldn't have worked at all.  So I went with the hook method.  I grabbed a couple packs of hooks at Dollar General, spending a grand total of $2 for this improvement.  I just held the pan lids on the door and positioned the hooks.  Perfect.  And it makes it so much easier to store and access my pots and pans without things crashing down on my toes.
 
Ignore the saw dust.  I need to vacuum my cabinets, my drawer sheds saw dust every time I open it.


On the top left, I stacked muffin trays together.  Then the mini loaf pan is next to those.  Cookie sheets of the same size stack together.  Larger items -- big cookie sheets, a platter and cutting board are stacked in order of convenience.  And another cutting board and collapsible collander lean against the right side of the cabinet.  On the bottom shelf are other baking pans -- a deep dish pizza pan, three layer cake pans, and an angel food cake pan.  On the back right area ll my skillets and the rest of the pots go in front.  I think this is a system I can work with and keep up.  Hopefully.

How do you organize your pots and pans?  Any great systems I should try out?  Or do you pans crash down on you too?

Thursday, April 25, 2013

Home Must-Haves: Kitchen

So it's state testing time which means as a school counselor I am at my busiest time of the year.  In my small school I'm the counselor for the whole district and the testing coordinator.  Oh boy.  That means working a lot and not much time for fun house stuff.  Or blogging.  Mostly it's working and then laying face down on my couch when I get home.

But, as you remember, I hosted a wedding shower last weekend.  So that's gotten me thinking about things I registered for when we got married and what was useful and what wasn't.  Today I'm focusing on the kitchen stuff.  Because well, the kitchen stuff is my favorite.  Absolute favorite.  There were some things we registered for/already owned that I'm completely 100% committed to.  Other things however, we've never used.  Of course, this is just my own personal opinion. 

First the kitchen failures.  No pictures, sorry.  Like I said, it's the busy time of year.  I have on tennis shoes and dress pants.  Don't judge me.
1.  A waffle maker.  I love waffles.  This seemed like a great thing to register for.  In two and a half years of marriage, we've never used it.  My husband isn't really a big breakfast fan.  So it just wasn't a practical thing for us.
2.  A pop up toaster.  We got two.  Yes, we registered for this.  We also registered for (and ended up buying ourselves) a toaster oven.  The toaster oven we use all the time.  The pop up toaster, never.  They both stayed in the box.  Maybe it's because I grew up  using a toaster oven, but it's just my preference.  And a toaster oven is so much more versatile.  Go with that.

Of course there are things that are wonderful.  Things I completely love.
1.  KitchenAid Mixer.   When I first got it, I kept it in the laundry room closet with all my other small appliances.  Until my friend mocked me and informed me you kept your Kitchen Aid on the counter.  Now I do and I use it multiple times a week.  It's my absolute favorite appliance.  I love that I can just throw stuff in the mixer and walk away while it does its thing.  Seriously amazing guys.  Yes, it's expensive.  We didn't receive it as a gift.  I hoarded all our Target gift cards and used a Target coupon to buy it.  I only ended up paying about $5 out of pocket.  That's an excellent tip, if there are big things you want but didn't get, save your gift cards for some of those bigger ticket items.
2.  Baking racks.  How had I never had baking racks before?  My best friend bought these for us.  I don't use them super often, but when I do, I'm extremely glad to have them.  And they fold up flat so they don't take up much cabinet space, another perk.
3.  Silicon spatulas.  My grandma Celia bought these for me right after I graduated from college.  So I've had them a good....  7 years.  Sheesh.  They are amazing.  I use them for everything and have at least 5 of them.  Don't waste your money or registry on anything else.  Silicon spatulas for the win.  I actually have these exact spatulas.  I also like the Paula Dean ones with a wooden handle, they don't get hot when you're using them to stir at the stove.
4.  Dishes.  Nice, simple dishes.  You don't need some crazy, trendy pattern.  Chances are your taste will change eventually and you'll end up regretting those rooster plates.  Unless it's Corelle.  Any Corelle is always in style.  My mom had the same set of Corelle for years, they are timeless and indestructible.  But we have a set of white dishes for every day.  And a set of black dishes when we're feeling fancier.  I have china, but I have never used it.  My white dishes I've had since just after college.  They were a giant set from Bed Bath and Beyond for super cheap.  A few pieces have been broken but they're so basic it's not a big deal to pick up a replacement.
5.  Silicon whisk.  This is a new purchase.  I bought mine about a year ago at World Market.  These are amazing, especially if you have non-stick coated pans.  I use mine when I make the filling for chocolate pie.  Also for scrambled eggs and anything I want to mix a lot.  Buy one.  They're less than five bucks and totally worth it.
6.  A platter.  We all have occasions where we need a nice big plate to put something on.  Brownies for work.  A turkey for Thanksgiving.  You know, just stuff.  It doesn't have to be anything fancy.  I had to buy a plate the other day at Target for my pinwheels for my party.  A cute platter that  you can use for everything.  And that people will recognize is yours.  This is especially helpful at family dinners or other functions where lots of people have brought dishes.  That way you can easily retrieve your plate and people will know, oh yeah, I totally know who brought that delicious food.

What are your kitchen must haves?  I'm sure I have more but these are my absolute faves at the moment.  Anybody else wedding gift shopping right now?  And laughing back at some of the things you registered for because you were sure you needed it?

Friday, March 8, 2013

Black not White

The kitchen is the heart of the home, right?  When we bought our house, the heart of it was in serious trouble.  And it's been a nearly two year process to get it where we wanted it.  So, since we can call it 95% done I'm calling it.  I'm ready to show it off.  We've come a long way since the orange-red walls and the pink Formica.
Our kitchen on the day of home inspection.

Dining Room.  Complete with HUD stickers on the windows.  Keepin' it classy.

And then we worked our little tails off.  We cleaned all the cabinets and repainted them black.  We also relocated the door knobs because they were in weirdo places.  We installed new Formica counter tops, I originally wanted acrylic but that was a little out of my price range.  We bought a new black acrylic sink.  We installed new back splash, it's those big back splash "tiles" from Lowe's, they're made out of plastic.  Oh, and we painted the walls and all the trim.  And I painted the 70s-tastic fluorescent light fixture silver and painted the ceiling fan to match.
 Progress!  This is what we worked with for about a year and a half.
 Not too shabby, right.  
But look at those terrible floors.  They just make everything sad.

Fast forward to last week when we installed our new laminate floors.  And I painted the dining table, proving that our dining room does still exist and hasn't fallen off the side of the house. 


I still love going in and just staring.  It's a thing of beauty.  We still need to do quarter round around the edges of the flooring.  And I need to paint the window trim.  For the most part the curtains cover it up, and I just pretend it looks okay.  It doesn't but I just keep telling myself that it's fine.  Someday.  But it feels great to have it so very nearly done.

I've had kind of an ongoing mental battle over my cabinet color.  I keep second guessing the decision of painting the cabinets black.  I see all these gorgeous kitchens with gleaming white cabinets.  And I worry that I made the wrong choice.  But when I walk into my kitchen, I love the black.  I love that it's a little different.  And it's so warm and cozy.  It's the kind of kitchen I just want to hang out in.  The other night I grabbed a floor pillow and plopped down with the iPad to look at recipes while my husband was cooking dinner.  It was perfect.

What about you guys?  What color is your kitchen?  Is it a color you chose or one that came with the house?  Are you happy with the color?  Or are you like me and constantly second guess your decision?  In the end, I love our kitchen.

Tuesday, March 5, 2013

And We're Calling It

I think it's official.  The table is done.  When we started this whole table project, I knew I had something good in mind.  I just wasn't sure what.  I originally thought just plain grey would be good.  So I headed over to Pinterest and started pinning some grey tables.  They were gorgeous.  So clean and simple.


I loved them.  I mean really loved them.  But then I started thinking that maybe it would be too plain.  I wasn't really interested in making seat cushions for extra interest.  So I knew it had to be something with the table top.  A while back I had seen some great table top decals that were a chevron design.  And I thought I could probably create it myself for way cheaper.  So I headed back to Pinterest to look for some grey and white chevron inspiration.  Of course I struck gold.


And now the table is in the kitchen. So so pretty.  The best part is.... I spent less than $20!!!!!  Yup, a total table make over for less than twenty bucks.  I already had the white paint.  I can't even remember what I bought it for....  But since it was already in my paint stash in the basement, it counts as free.  I did buy the grey paint for about $8 at Walmart.  And I grabbed a pint of Poly-Acrylic at Lowe's over the weekend to seal the table.  I probably didn't really need to seal it, but with the Formica and all the time I spent, I didn't want to take any chances.

Before.


After.

Somehow the combination of the new floor and the table face lift have made the dining room next to impossible to photograph well.  Or maybe we can blame it on the snow outside.  Blarg.  So please forgive me.  I tried.  But, it looks gorgeous in person.  I am so happy with it.

And since it's finally done, I'm linking up to the Winter Pinterest Challenge.

I have loved seeing some of your guys Pinspired projects.  Now with the table all painted and pretty, I can't wait to show you guys my kitchen tour.  If all goes as planned, I'll be back with the whole kitchen to show off later this week.  Without the chairs still obviously.  After conferring with a friend today, I think I've decided to just spray paint the chairs so I can be done.  Where do you stand on spray painting furniture?  I love it for small pieces and hard to paint items (like that turquoise table).  


Monday, March 4, 2013

Gimme Three Steps

As I kept thinking about the title, that song has been totally stuck in my head.  Ug.  I mean I like Lynyrd Skynyrd as much as the next girl, but now I've got Gimme Three Steps in my head.  Failure, Mary.

I can't call the table totally done, but it's so so close.  Steps one and two are done.

Step one:  Prime and paint.  I used Sherwin Williams Adhesive Primer since my table top was Formica.  Everything I read suggested sanding and priming if you were going to attempt painting Formica.  I figured the adhesive primer gave me the best chance of success.  I had it leftover from painting our paneling in the hallway.  For the paint color I used Krylon Acrylic Latex Enamel in Satin Classic Gray.  It's the perfect soft grey kind of color.  You got a sneak peak of it the other day.

Step two:  Stripes!!!!  This was not an exact science.  I used an ad we got in the mail and cut it into a triangle.  I used a Sharpie and my template to measure off my chevron pattern.  Then I taped them off using Frog Tape.  I heart Frog Tape!
I sealed the edges by just painting a light coat of grey where they white stripes were going to be.
After the grey was dry I painted on about 5 coats of white.  Yes, five coats.  It took forever.
But when I peeled off the tape, it was totally worth it.  I'm in love.  I mean check out those gorgeous, clean lines.

Step three:  That's going to be a coat of poly-acrylic to seal it.  I don't usually seal things, but I figured for out kitchen table it was probably a necessity.  So, as soon as the poly-acrylic goes on the table can move back into the kitchen for the final reveal.

Of course it won't really be the final reveal because the chairs are still burgundy.  And sitting in our office waiting to be painted.  I'm avoiding thinking about painting them.  I'm not sure I've recovered from the last time I painted them.  I remember it taking days.  So I'm not looking forward to painting the chairs,  especially knowing it's going to take multiple coats of paint.

Anybody want to come help me paint chairs?  What did you do this weekend?  I tried to think of a way to convince my husband to go with me to Hobby Lobby but I never made it.  I think I might get to go this week, I'm going to a conference and I'm hoping to talk my conference buddy into a trip to Hobby Lobby.  Are you lucky enough to have a good craft store close?  If so, I'm really jealous!

Wednesday, February 27, 2013

Weather Fail

Here's the thing guys, I usually don't worry about the weather this much.  Or talk about it this much.  But this snow is kicking my tail.  I'm on my fourth snow day today.  Our power went out about 7:45 last night and didn't come back on till around 11 this morning.  That is a long time without power when it's 28 degrees kids.  We added an extra comforter (making it to a grand total of three) to the bed last night and it wasn't too bad.  This morning I woke up to a cold house.  Threw on some Under Armour pants under my yoga pants and a long sleeved t-shirt under my husband's Eddie Bauer sweatshirt before putting on fuzzy boot slippers and my hooded bathrobe.  Then I covered up on the couch with a fleece blanket and a comforter.  While I read my book, I desperately wished for a nice steaming mug of hot chocolate.  But now, after about 15 hours, the power is back on and I am much happier.  

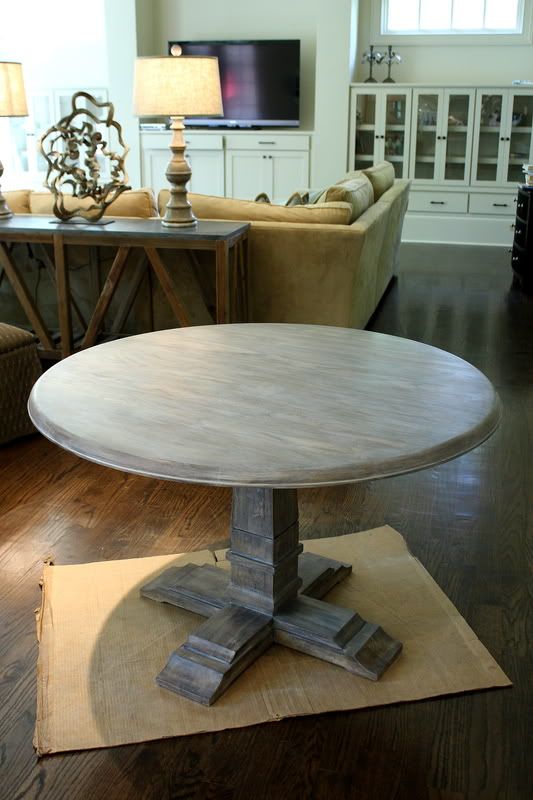
So, with all the nasty weather, my Pinterest project is horribly behind.  I have plans of finishing it by this weekend though.  I got two coats of paint on the table yesterday.  It's already looking way better.  I'm going to do a third coat of grey today before I can start on the top secret second step.  I can't wait to share it!  I also can't wait to get it out of the living room.  Yes, the living room.  When it's too cold to paint furniture outside and you've just installed new kitchen floors, you go to whatever lengths are necessary to get your table painted.  So, for right now the table is sitting on a tarp in the middle of the living room.  Amazing.  

As much as I am looking forward to finishing the table, I am dreading doing the chairs.  I wish it was warm enough to just spray paint them.  I painted these chairs back right after college and it was the most gigantic pain in my neck so I know three coats of grey paint on them isn't going to be a picnic.  So, it may be a hot minute before the whole project gets done, but I have high hopes of getting the table done in the next couple of days.  Keep your fingers crossed!

So much prettier, right?  The legs are a normal size, this is just an awkward angle.  It's hard to take a good picture of a table in the middle of the living room.  I'm getting ready to do coat three right now.  Eek, I'm excited!

How did your guys Pinterest projects go?  I've seen a few and they are amazing!  Anybody want to make a special delivery of a Starbucks peppermint mocha?  I'd love it!  I'm not sure my car is going to make it out of my driveway for a few more days.  I guess I'll settle for a hot chocolate.