Showing posts with label decorating. Show all posts

Thursday, February 27, 2014

Spring Wish List: House Version

Hi guys.  It's been a while.  I've been at the gym instead of DIYing.  But I am so ready for spring and I have some ideas/plans.

First up is our yard.  This is hopefully a spring break project, assuming the weather cooperates.  We need the ground to not be frozen solid.
We're hoping to fence this portion of the yard.  Coming out from the east (left in the picture) and making a big square out to the pond (which is behind me when I'm taking this picture) and then around the west (right) side of the house.  That way our crazy dog can go out and get some exercise more often.  And maybe the neighbor dogs will quit carrying off his stuff.  We have plans of how we'll do it, the weather/ground just has to cooperate.

And then there's living room art.  Guys, I'm just not feeling it.  In general I'm just not in love with the stuff we have on our walls.  I feel like it's just blah.  This is what we have going on above the couch right now.
I mean it's okay, but it's just not doing it for me.  I'm thinking a big canvas of a sandy beach and maybe some other stuff.  It's a big honking wall and it needs some attention.

Next on the chopping block is our bedroom.  It's a super disaster.  We don't have enough storage and our bedroom is pretty tiny.  Especially with our king sized bed.  In my dream we have two six or eight drawer dressers.  One for each of us.   I'd also like to get rid of our hulking old 32" TV (which would also mean getting rid of the stupid TV cabinet that the bathroom and closet doors slam into at least once a day) and replacing it with a nice sleek flat screen to hang on the wall.  In a dream world I would also ditch those doors for the bathroom and closet, maybe with barn doors.  We have three doors in a row on one wall, terrible design plan.

I also have some plans for our hall bathroom.  We have towels that just hang in there.  They match the bathroom.  No one uses them.  It's ridiculous.
It's completely my fault.  It was my decision when we bought the house.  New plan:  get rid of the towel bar.  Put a couple of hooks on the back of the door for actual use.  Put those green towels in the linen closet for actual use, what's the point of having them if they just hang there.  Replace the towel bar with some built in shelving.  Also, buy a new shower curtain.  That one's fine but I'm ready for something different.  I don't know what, just different.
 
And then my last thing on my immediate fix it list is our laundry room.  Oh holy cow.  My organization is not efficient.  The layout is not great, but for the time being cannot be fixed.  The washer is on one side of the room, the dryer is on the other.  And I just don't have the right storage.  The dream is to build (have my dad build) a laundry basket dresser.  With slots for four laundry baskets:  jeans, towels, brights/darks, and whites/lights.  And along with the laundry basket dresser, I'd like a cabinet with a door to stash some of those crazy things that have no home.  Two wrought iron (ish) four tier cake stands anyone.  And maybe on the very end of that cabinet some built in storage for snow boots.  Right now they just get dumped in the laundry room doorway, it's ridiculous.  

So, that's the current house wishlist.  I think I have my work cut out for me.  I was just starting to feel like our house might be done.  And now I'm laughing at myself a little.  It's never done is it?  What are you guys working on these days?  Anybody else seriously overcome with a case of winter blahs?


Tuesday, December 17, 2013

Oh Christmas Tree

The tree is up.  Presents are wrapped.  Almost all the presents are bought.  I think we might almost be ready for Christmas.

And I was successful.  I didn't buy any new decorations this year.  I did have to buy new lights but that was because I bought a new tree at the end of the season last year.  And I only did that because I broke the old tree.  Ug, talk about a Christmas fail.  Anyway, a new white tree meant I wanted white corded lights, the green would've looked a little rough.  So I guess technically I spent about $7.50 on Christmas decorating supplies.  Not too shabby though.

So, on to what we all really care about.  The decorations.
 I wasn't sure how I would feel about the white tree.  I didn't know if it would feel Christmassy enough.  It does.  I love it.

 The Christmas presents do not match each other...  I had plans for wrapping.  And they did not turn out as I imagined.  I was going to use brown kraft paper, gold and silver ribbons, and metallic Sharpies to label my gifts.  The kraft paper did not cooperate.  So I ripped it off and went into the wrapping closet and came out with leftover gold paper and green paper with reindeer for the kids.  They look fine, I just like to have a wrapping color scheme and color coded by family.

My olive wood nativity from Israel.

Stockings, mini cone Christmas trees, and a little confetti on canvases.  Much simpler this year.

The Merry & Bright sign I made last year, the Santa & Frosty candles of my childhood (they truly belong on the back of the toilet), and another nativity.

 My lazy Christmas card hanging.  Silver glitter washi tape hung up on our door to the basement.  I'm kind of okay with it though.
And the Christmas tree all lit up in a dark room.  My favorite way to look at it.  One of these nights I'm planning on shoving all the presents out of the way and laying with my head under the tree.  It's the best.

How's your Christmas decorating going this year?  I feel like I did a lot less this year but I'm really happy with it.  I kind of liked simplifying.  I also feel like I didn't go as crazy buying presents this year.  I also feel good about that.  I love buying people things they will really like and not just buying to buy. 

Oh, btw, I'm linking up over at Thrifty Decor Chick's Christmas party.
 

Wednesday, November 13, 2013

Christmas Plans

Oh man, I am so ready to dig out my Christmas tree.  I'm extra excited this year because we have a brand spanking new white Christmas tree.  This will either be the very best or horribly worst tree purchase I've ever made. 

You may remember I broke my Christmas tree last year.  Yup, you read that right.  I broke it.  Not like it was a huge loss considering it cost $15 almost ten years ago.  And it was a 6 foot tree, so obviously very real looking and high quality.  I was pulling the garland (or tinsel as I like to call it) off my tree and yanked too hard and the whole dang tree came crashing down.  On top of me.  I broke the whole base.  Well, when you wait until New Years Day to take down your tree, there are not a lot of trees left to buy when you go to replace it on January 2.  Thus the white tree.  Still only 6 feet tall but lots fluffier and it was only $20.  I'm super cheap.  I want a tall tree, but I don't want to pay a tall tree price.  Cheap.

But I'm pretty excited to decorate with my new tree.  And I'm pretty sure I'm going to be making some new ornaments.  Like I literally cannot wait to go to the store and buy a huge package of the clear ball ornaments and just go crazy.  But I'm making myself wait.  I'm hosting Thanksgiving this year for my family and that will make me crazy enough without adding in Christmas crafts.

But, this is what I'm thinking.
-A few beach inspired ornaments like these.  Complete with sand and shells from our Florida vacation.
-Maybe some cute sparkly monogram ones like these.  Because you can just really never have enough glitter.
-And some filled with glitter like this or this.  Or even some glittered styrofoam balls reminiscent of my childhood.  I may have a glitter addiction.  My husband totally loves it...  Or maybe not.
-I also love these that are just filled with paint.  Obviously, not literally filled with paint.
-And I'm thinking some other randomly filled ornaments with tinsel or feathers would be super cute.

I'm also thinking any of these would be great to give as gifts.  Pretty sure the person I have for Secret Santa at working will be receiving a couple.

And just for fun, here's a quick flashback to Christmases of past.
Our mantle the first Christmas in our house.  I was super excited to have a mantle to decorate! 

Front door wreaths.  Unless I get super creative, these will be the same this year.

  
Looking at our tree up close, I'm reminded it was definitely time for a new tree.  But I love the pretty silver and gold.  It's also seeming not very decorated...  Strange.
 
The whole tree/mantle last year.  I loved how it looked.  But apparently precariously perching your tree on the hearth and a crate is not the best idea ever.  Lesson learned.

Anybody else dying to decorate for Christmas?  Or maybe you already have.  Like I said, I'm hosting Thanksgiving for the first time ever so get ready for some panic posts about Thanksgiving prep.  Any tips for first time holiday hosters?  I kinda feel like it's a lot of pressure for everything to be perfect. 

Wednesday, September 11, 2013

Time Flies

I mentioned that I got to go to Hobby Lobby the other day (total high light of my week!).  I was having serious decision making problems and all I left with was my bulletin board and supplies for that project.  I spent a long time in the clock aisle (they were 50% off) but I just couldn't commit.

So today I'm going to share some of my favorites.  Tell me what you think.  Which one needs to come live at my house?  I love the rustic looking ones but I'm just not sure that they're my style.  Ug, this is exactly why I couldn't make a decision...  Yes, there are TWELVE.  I have serious problems.
I love the birds, and it probably goes with our decor the best, but it's probably too small.

Same goes for this.  They chevron pattern is adorbs but, still too small.  And I know chevrons will eventually go the way of floral wallpaper and shag carpet...

This guy was big, but oh so pretty.  Also, upside down...

Kinda cute...

I almost brought this one home with me, I just don't know about rustic...

I liked the unexpected shape

I liked this but hate that the numbers 

So cute!  But once again, the aged thing... And it's probably too small?

This guy is pretty....

I really liked the map in the background on this one.

I like this too but it has the same number problem, so funky, I don't know that I could deal with that.

Crooked...  I like the kind of wood grain going on here.  I'm not sure it goes with our house either though.

What do you guys think?  Anybody else have problems making home decor decisions?  I thought texting a dozen pictures to my sister was a little overboard.  But, apparently that many clock pictures on the blog is completely acceptable...

Monday, September 9, 2013

A Not So Boring Board

Since I've been on this weight loss journey, I've decided I need a real life inspiration board. A cute one. To post things like a skinny picture and a fat picture, to you know, remind me where I am and where I want to be. Also some little inspirational quotes, my exercise calendar, and my weight loss countdown.

Well my mom got me a Hobby Lobby gift card so Saturday I headed for the city and Hobby Lobby.  I looked around for quite a while, I just wasn't sure what I wanted. A gift card is so much pressure, I always feel like I have to get something really good.

Then I spotted a bulletin board I liked. It wasn't colors or even the pattern I really wanted but it gave me an idea.


I remembered a really cute painting I ad seen on Pinterest. Kind of an abstract herringbone kind of thing.  Like this one or this one.  So I grabbed a medium-ish bulletin board and paint in three shade of pink and coral.  

I spent Saturday night painting my bulletin board. The coral I bought ended up being more orange than I had thought so I just mixed it with some pale pink until it was the color I wanted. Then I just kind of randomly painted and blended colors on my bulletin board until I was happy with how it looked.

Fast forward to Sunday. Herringbone time! I sat down to watch the Chiefs game with my husband (and my roll of frog tape). I started in the bottom left corner and jut eyeballed the pattern. If you're going to try this, be prepared, it's going to take a while. Like about half of a football game. I did take a break for some diet Cranberry Sierra Mist (the true sign of fall at our house) and summer sausage.

One it was taped off, I was ready to make my pattern shine.  I'm not usually into gold but I thought it would be perfect with my color pallet. Pretty sure I made the right choice. So I grabbed my gold spray paint and gave the whole thing, frame and all, a light coat of gold spray paint. And then I ran out :(  So I had to run to Dollar General and grab another can. I got home and gave it a second coat.

I also spray painted some cheap clear push pins gold for a little extra flair. And I figured I already had the supplies on hand, so why not.

After the second coat it was time to pull all that tape off. I would recommend doing this on a day it's not a hundred degrees, I was standing in the shade sweating as much as I did during my workout this morning. Anyway, the tape came off easy peasy.  And this is what I was left with.


I'm super happy with how it turned out. And the whole project came in under twenty bucks. It would've been even cheaper if I had just used paint I already had. I can't wait for it to finish off gassing so I can get it hung up.

How was your weekend? Anybody else tackle a simple project that was crazy time intensive?

Thursday, September 5, 2013

Clever Camoflauge

As you've probably figured out by now, there were some weird things about our house when we bought it.  One being a hole in the kitchen/dining room wall.  Yup, a hole.  Why was there a hole in the wall?  That's a very good question.  The best guess I have is that the location of the hole was where an old rotary wall phone was.  Much like the phone on the wall in my parents kitchen when I was a kid.  Before we covered up the hole there were some phone-ish looking wires that you could see.  Also, a Q-tip.  I don't even want to know.

It wasn't even a question as to whether we would cover up the hole with something.  I had envisioned something that would blend with the paneling.  My dad just knew I wanted the hole covered so he worked with what was on hand.  Oh yes, this is going somewhere weird.  If you recall, we had this whackadoodle pink Formica on the countertops and on the walls as backsplash.  Awesome.
What you can't see in this picture is the fact that part of the backsplash was very very loose.  So, my father, being the sweet and resourceful man he is...  And knowing I desperately wanted that hideous backsplash gone, cut off part of the Formica, turned it glue side out and cut a piece to fit in the hole.  So yes, I have a piece of Formica stuck in my wall, glue side out.  It's painted over, it matches the walls.  Except for the part that the rest of the wall is paneling and you know, paneling texture, not glued Formica texture.

I really appreciate that my dad fixed it.  And I don't know that any other solution would've really been any better.  So, we've always hung something over the hole.  The awkward thing is though, the hole is low and not really visually a normal level to hang pictures.  It's driven me crazy for the past two and a half years.  I had one of those cute name signs hanging over it, I like the sign, it just didn't look quite right.

So, the other day on Pinterest I stumbled across some adorable printables.  I love things that are kind of funny puns.  And kitchen related puns are even better.  This was only made more perfect that my sister got me an Etsy gift card, thus allowing me to purchase these adorable printables.  Hooray!  They were delivered to my inbox in a flash, I printed them at Walgreens and picked up some cheap frames to pop them into.

I hung them in a sweet little four-some.  I'm so pleased with how it turned out.  If I was a better DIY-er, I would've measured and used a level but I never do.  I totally hang everything by eyeballing it, for the most part this has worked out okay with me.


Excuse the awkward pictures.  My dining table was in the way and my kitchen was not in its most flattering light.  I'm so happy with how they turned out.  And they are oh so cute.  When we had people over this weekend, everybody commented on them.  I call that a success.  And it's at a much better level and still disguises the wall patch.

Anybody else have weird holes in their walls?  No?  Just me?  Sadly, that's what I thought.  How do you deal with funky decorating problems?

Saturday, August 10, 2013

Ready for Fall

I know, it's barely August, but Missouri has had a funky summer.  We're apparently in the middle of monsoon season, we've had tons of rain.  And it's been unseasonably cool.  I'm not complaining.  Well, the rain could let up a little, it's getting kind of ridiculous.  But, the rainy days and cooler weather (even though it's supposed to be 87 today, that's still cooler for this time of year....) have made me ready for fall.  If you follow me on Pinterest, you may have noticed that I pinned like a thousand fall mantles yesterday. 

Don't get me wrong.  I love love love how we have our mantle right now.  But I guess I'm kind of ready to switch it up.  I'm actually really ready to decorate for Christmas but I can't get too far ahead of the seasons.  Last year I bought a new tree at the end of the season because I broke our old one.  Not that it wasn't time for a new tree, the one we had I bought in college for $15.  So, for a six foot tree purchased nearly ten years ago, it didn't have a bad life.  However, it was kind of late when I bought the new tree.  Like around New Year's.  And the selection was very picked over.  So we ended up with a white tree.  I'm pretty excited about putting it up, something different.  I'm also a little afraid I'm going to hate it.  But I'm already thinking about where I'm going to put it.  I think I need to build something to set the tree up on so we'll see.

Okay, back to fall.  Here's what we did last year.

I'm thinking about something similar this year.  But I want to find fake pumpkins.  I spent way too much time and money on real pumpkins last year.  The plain orange one rotted and collapsed.  Same with the white argyle one.  Not cool.  The big chevron one though, it's still in my freezer.  Not the whole pumpkin, but my mom and I processed it so I can make pie, bread, etc.  Yum!

Anyway, I can't wait to start decorating for fall.  I'm ready for the dollar store to be done with back to school so I can find some cheap pumpkins.  I try not to go absolutely crazy switching seasons, but I like a little variety.  I'm not good at keeping things the same.

Anybody else ready to decorate for fall?  While secretly thinking about Christmas decorating?  What I really should be planning is my 30th birthday party.  Eek!  I better get on it!


Monday, July 22, 2013

Put a Bow on it, We're Calling it Done

Sadly, not the front yard.  But the hallway.  The hallway is done!  And I love it.  It seems like this is one of the areas we've worked on off and on for the longest.  Maybe it's because I couldn't seem to come up with a clear vision for the hall.  But now that it's done, I love it so much and it's exactly what I wanted.

I had friends over Friday so that was just the motivator I needed to get everything all finished and ready to show off.  Of course I didn't make plans for them to come over until Thursday so I spent Thursday & Friday speed cleaning and speed decorating/painting to get ready.  And cooking.  There was cooking too.

Back to the hallway.  Tomorrow I'll share recipes from the goodies I whipped up.  We're still enjoying the leftovers and they are amazing.

In case you've forgotten, the hallway is the one place that still had original paneling colored walls when we bought our house.  In an already dark hallway, it made the space feel like a cave.

I'm not going to show you all the progress pictures again.  Because I feel like I've talked about this a thousand times and I'm completely sick of looking at my lack of progress.  But, if you want to check out all the hallway progress, go ahead and click and check it out.

But I had a plan for the hallway (eventually).  Tan on the bottom and a light turquoise on top.  With a pretty gallery wall.  I made a mood board.

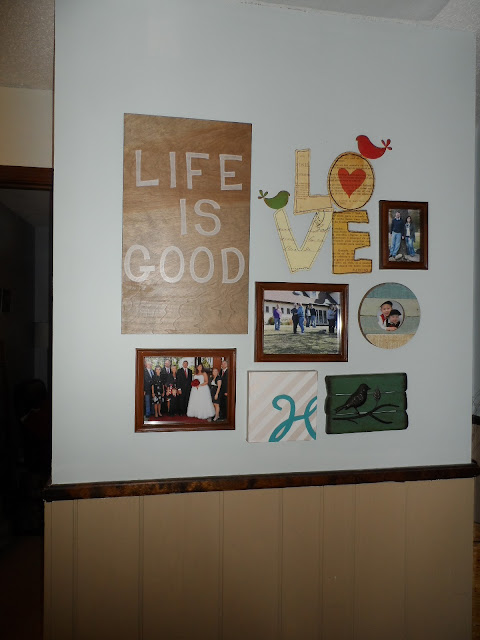
So I finally got the walls painted with a second coat for great coverage.  And I laid out my pieces for my gallery wall.  Well, I laid it out twice.  Was sure I had the right combination and then still hung it up differently because I under-estimated the size of my wall.  Oops.  
So, not bad for a first layout, right?  The trick, that big "Life is Good" sign needed to go on a stud because it's a solid piece of wood.  But I was pretty sure I could fit everything....

Then I ended up adding two more frames.  I realized if I had a picture of my family, I needed one of my husband's family also.  And then I remembered a cute round turquoise frame I had and could pop a cute picture of our nephews into....

Then I was ready to hang it all on the wall.  There wasn't enough space.  Oops.  So, the floating frame that held the picture of our wedding party got moved to another wall and I just ended up with family pictures and some other little pieces of art.

So, let's break down what's on the wall....  On the top row, a Life is Good piece of art I made with a leftover scrap of wood from building my living room entertainment center/dresser.  I stenciled the words on with a white Sharpie paint pen and stained it with grey stain.  I sealed it with some poly-urethane.  And I painted the edges of the board a bright turquoise.  To the right is a metal Love sign I picked up at Hobby Lobby the other day.  Love it.  And next door is a picture of me and my husband from when we had family pictures with my family.  In the middle row is a picture of my family with one of my sisters and her boyfriend cut off, the picture is oriented weird.  Annoying.  Then the round frame is a picture of our adorable nephews.  And finally the bottom row has a picture of my husband's family on our wedding day.  Next to that is the Custom Monogram Art I whipped up the other day and the bird wall hanging I grabbed on clearance at Hobby Lobby the beginning of the summer.

What did you guys do this weekend?  Anybody else finish up some lingering projects?  We're tackling the rest of the front yard this week, I'm pretty excited to have things caught up before I go back to school.


Friday, June 14, 2013

Feeling Blue....

Or turquoise.  I have a plan for the hallway.  I mentioned a while back I was considering a gallery wall.  That's still in the works.  And I have picked a wall color.  So, here's what we have going on right now.
Excuse the terrible picture.  There is zero natural light in the hall and it's practically impossible to take a decent picture.  So we have tan walls on both top and bottom.  And there's the switch for the no longer functioning attic fan that will need to be covered up with something.

This is the paint color.  The same color I painted my office.  I just pained a little swatch to see how it looked.  I'm going to need to prime before I can paint because the tan definitely showed through the new paint.  Boo. 

1.  Paint Color:  Ocean Air by Benjamin Moore.  A perfect pale turquoise.  I love it.  I got it color matched at Walmart to just their cheap paint.  I usually use Sherwin Williams.
2.  I love this pattern.  Gorgeous colors.  Maybe framed.  Maybe with words over it....
3.  This art is gorgeous.  Way out of my price range, but gorgeous.
4.  I already picked up this little guy at Hobby Lobby a while back.  He was on clearance for around six bucks.  And adorable.
5.  I love this life is good sign.  I've been eyeballing it at Kirkland's.  But it's not available right now.  I think I have a piece of scrap wood hanging out in my basement I can make it out of.
6.  And this graphic art is fantastic.  Something like this would be super easy to make and perfect to cover up the attic fan switch.

There will of course still be some pictures thrown in also.  Probably wedding pictures.  And maybe a couple of family pictures.  No exact plan for that yet, but I think I have a good start.

Thursday, June 6, 2013

Rio and Romance

Okay, I have wall art to talk about today but before I can do that I have to tell you guys what I found on my porch yesterday.  A couple of weeks my girl Geesha blogged about some sweet little parrot vases she'd gotten on eBay.  And since she is the sweetest bloggy buddy, she wanted to split her pair of parrots and send one my way.  He arrived on my front porch yesterday.  Man, that girl knows how to pack a bird in a box.  Next time I move Geesha, I'm calling you!

So, his name is Rio.  He doesn't have a home yet.  I'm still moving him around to find the perfect spot.  And I need to get some flowers, but I couldn't wait to show him off.  So, I set him on our built ins in the living room and snapped away.
He's so cute, right!  Pretty excited to find him the perfect home.  I'm thinking front entryway table maybe.  I love him though.  So thanks Geesha for being the sweetest!  As soon as my summer break starts, something great (still to be determined) is headed your way.  Maybe a fun little homey craft.

Speaking of fun little homey crafts....  Back during the Spring Pinterest Challenge I created some art work for our bedroom.  Well, I had another project up my sleeve, I just ran out of time due to being crazy busy at work.  So, almost a month later, it's done and up on the wall.  This was actually a project my husband picked.  I wanted something kind of sweet and romantic to hang on our wall in the bedroom.  I gave him the choice of a couple of little sayings and then I suggested using part of the lyrics from our first dance song from our wedding.  That idea was the winner.  

I knew I wanted to do quite a bit of the song so my usual method of printing out the words and then tracing through the paper onto wood and filling in the outline was impractical and would quickly drive me crazy.  So I set out to find a better method.  Then I found this.  Guys, this is the most brilliant thing ever.  You get a board and paint it.  Then you print out whatever you want on a laser printer (I used the one at work).  The trick is you have to print a mirror image.  Then you just spread Mod Podge on your painted board.  Lay your paper onto the wet Mod Podge.  Smooth it out and press the paper on there really well.  Once the Mod Podge is completely dry, you wet the paper (I used a spray bottle) and just rub the paper off.  The ink magically stays behind.  It is seriously amazing.  Oh and then just throw a layer of Mod Podge over the whole thing just for funsies.

It took me two tries to get it right but I just flipped over the wood and used the other size.  I love it so much.  Now it's up on our bedroom wall.  Yippee!  I may need to add a couple of pictures beside it just to balance it, but all in all, I'm so incredibly happy with it.
Sitting in the living room waiting for a coat of Mod Podge

Ignore the shadows.  I was taking pictures at night.  I'm a bad blogger. 


Ready for a close up.  I like that all the letters didn't transfer perfectly.

Perspective.  I'm thinking I might hang a couple of our wedding pictures right next to it.

And if you're trying to identify the song.  It's Heaven by Bryan Adams.  It was my father-in-law's idea.  And it was perfect.  He's in a band, his band played our whole wedding reception which was amazing.
And just for fun, a picture of us dancing at our wedding.

And it's possible I'm listening to Bryan Adams right now....  Anybody else finishing up a project that's been in the works forever?  I'm ready to be out of school for the summer so I can tackle my summer list.  And find Rio a good home.